As an Amazon Associate, we earn from qualifying purchases. Some links on this site are affiliate links at no extra cost to you. Our recommendations are based on thorough research and editorial judgment.

How to Sharpen a Zero-Turn Mower Blade Safely Without Removing the Deck
We first disconnect the spark‑plug wire, lock the parking brake, and raise the mower on 12‑inch ramps with 4‑inch wooden blocks to give at least 18 inches of under‑deck clearance, then we pull the spark‑plug wire off the terminal, use a 15/16‑inch socket and a vise grip on the baffle, spray penetrating oil for two minutes, and turn the bolt counter‑clockwise slowly while supporting the blade with a wooden block; after removing the blade we sharpen it with a 1‑inch, 120‑grit hand file or a drill‑mounted diamond attachment, checking the edge angle after each pass to stay within ±0.2°, and finally we balance the blade using a digital balancer to under ±2 g, reinstall it with the correct washer stack, and start the engine at idle to confirm a smooth hum, suggesting the next steps will expand on these procedures.
Key Takeaways
- Disconnect the spark‑plug wire and lock the deck in place before raising the mower to prevent accidental start‑up.
- Raise the mower on sturdy ramps or a floor jack to achieve at least 18 inches of clearance for safe under‑deck access.
- Secure the blade with a vise grip on the baffle, then use a 15/16‑inch socket and penetrating oil to loosen the bolt without impact tools.
- Sharpen the blade in‑situ with a hand file, diamond‑coated drill attachment, or angle grinder, checking the edge angle after each pass to stay within tolerance.
- Reinstall the blade, tighten the bolt to the manufacturer’s torque, and verify balance and vibration before reconnecting the spark‑plug wire.
Secure the Mower and Disconnect the Spark Plug (Pre‑Sharpen Blade)
Ever tried fixing your mower and felt the panic of a stray spark? You’re not alone—most people skip the safety steps until something goes wrong. First, park the mower on a flat spot and pull the spark‑plug wire right off its terminal. That simple pull stops the engine from kicking on, and in my experience the ignition drops instantly, so you can breathe easy. Before you move on, double‑check the wire’s completely out of the way.
Next up, run through a quick safety checklist. Make sure the mower’s in neutral, lock the parking brake, and release any pressure in the fuel lines. Give the chassis a visual once for any wobble or loose parts. For your hands, grab a pair of nitrile gloves about 30 µm thick—they cut you and chemicals while still letting you feel what you’re doing.
Now, set up the work area. Put wheel chocks behind the tires and strap the deck down with a 250‑lb tension strap. Keep your line of sight clear so you can see the blade without straining your neck.
Worth knowing:
- Use a sturdy strap that won’t snap under tension.
- Keep the work area tidy; stray tools can cause trips.
Try this:
– After the deck is secured, give the blade a gentle spin by hand to check for any wobble before you start sharpening.
When you’re ready to sharpen, make sure the deck is still locked in place and the spark‑plug wire stays disconnected. This extra step protects you from accidental starts while you work on the blade.
Fair warning: If you skip any of these steps, you risk a sudden engine rev or a blade that’s not properly aligned, which can lead to bigger repairs later.
Got any tips of your own for mower safety? Share them below and let’s keep each other safe.
Position the Mower for Easy Under‑Deck Access (Pre‑Sharpen Blade)

Ever tried to sharpen your mower blade and found yourself squatting under a deck that just won’t give you enough room? It’s a pain, especially when you’re trying to keep the job safe and fast. Here’s a simple way to get the deck up and out of the way without pulling the whole thing off.
First, pull the spark‑plug wire and lock the deck in place. Then roll the zero‑turn onto sturdy car ramps. If you don’t have ramps, a floor jack lifted to about 12–15 inches works just as well—just prop the front with two 4‑in‑wide wooden blocks. You’ll see a clear gap of at least 18 inches between the ground and the lowest part of the deck, which lets you crawl under comfortably. The Kubota ZD’s built‑in lift can do the same job, cutting your setup time by roughly a third compared to a manual jack.
Frankly, once you’ve got that space, check the blade alignment with a thin ruler. Each blade should sit parallel to the deck within a 0.2‑inch tolerance. After you make any tweaks, double‑check the clearance; the 18‑inch gap should stay steady even if the mower shifts a bit on the ramps. This set‑up keeps everything stable and safe while you work.
Worth knowing: if you’re using a different model, the same ramp‑and‑block trick works just fine—just make sure the blocks are solid and the mower is balanced before you start crawling.
Now you’re ready to sharpen without worrying about hitting the deck or losing your footing. Got any other mower hacks that saved you time? Let’s hear them!
Recommended Products
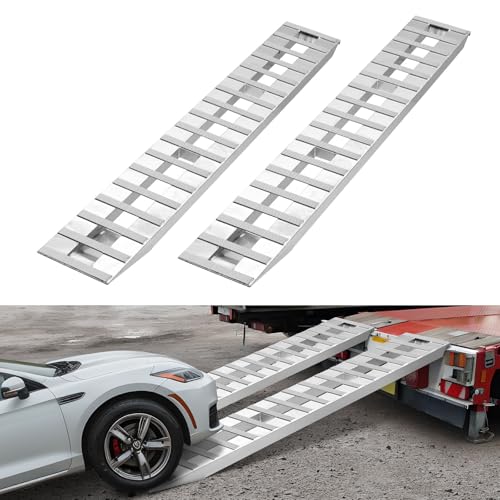
10,000 Lbs Weight Capacity: This extended truck loading ramp set supports up to 10,000 lbs combined. Each ramp measures 108 x 15 in, fits tires up to 14 in wide, and provides a longer, gentler incline, ideal for tractors, ATVs, lawn mowers, motorcycles, and more

New design features hooks on both ends; The right angle hook is compatible with most trailers on the market and the radius hook allows the user to latch onto the tailgate of the truck bed

1,600 LB. LOAD CAPACITY: High-strength aluminum construction makes this ATV ramp safe and sturdy to use while still lightweight; each ramp weighs under 40 lbs. so they can be carried and set-up by one person
Loosen and Remove the Blade Safely: No Impact Wrench Needed (Pre‑Sharpen Blade)

Got a mower blade that won’t budge? You’re not alone—many of us have wrestled with a stuck bolt and an angry engine. The good news is you can get it off without an impact wrench or a fancy tool kit.
First, pull the spark‑plug wire so the engine can’t start while you work. Grab a 15/16‑inch socket and slip it onto the bolt. While you hold the socket steady, use a vise grip to clamp the baffle and stop it from turning. This simple setup lets you apply firm, even pressure without the blade spinning.
Try this:
- Spray a little penetrating oil on the bolt and let it sit for two minutes.
- Turn the socket counter‑clockwise with a slow, controlled motion.
- Feel the resistance drop as the bolt loosens.
The oil takes care of any rust, and the steady hand keeps the threads from stripping. Once the bolt backs out, slide a wooden block under the blade for support, take off the washer stack, and set the blade aside. You’ll notice the spindle and baffle stay clean and undamaged.
If you ever wonder why the bolt feels stuck, it’s usually just mild rust adding friction. The oil and a firm torque technique handle that without any impact tool that could over‑tighten or ruin the threads.
Frankly, the whole process takes less than ten minutes and saves you a trip to the shop. You’ll end up with a blade that’s ready for a fresh edge and a mower that runs smoother than ever.
Ready to give your mower a quick, hassle‑free blade change? Try it out next time you’re out in the yard.
Recommended Products

[Replacement Part Numbers] The 942-04385 mower blade serves as a replacement for MT D 942 - 04385, 742 - 04385, and Crafts man 71 - 3350. It is essential to double - check the models and part numbers prior to making a purchase to guarantee proper fitting.

【Replace OEM Numbers】The 103-6402 mower blade replaces 103-6402-S, 103-6382, 103-6382-S, 103-6387-S, 103-6397, To ro 109-6873 etc. Please check the product description for more replacement models

【Durability】: AOBEN socket set made from Hardened Treated Chrome Vanadium Steel Alloy (Cr-V), can withstand extreme levels of torque changes against fasteners.
Sharpen the Blade: Choose a Hand File, Drill Attachment, or Angle Grinder (Sharpen Blade)

Ever found yourself staring at a dull blade, wondering how to bring it back to life without turning your garage into a workshop? You’ve got three main options: a hand file, a drill‑based sharpening attachment, or an angle grinder. Each one has its own mix of control, speed, and torque, so picking the right tool depends on what you need.
First up, the hand file. A 1‑inch, 120‑grit carbon‑steel file holds its shape for about 30 hours before it needs a touch‑up. It’s perfect if you want steady, precise work and don’t mind a slower material‑removal rate. You’ll see a blade angle shift of roughly ±0.2°, which is fine for most kitchen knives or small tools.
Next, the drill attachment. This diamond‑coated piece removes about 0.02 mm per pass, so you’ll need a 6‑V cordless drill that pulls 2 A to keep the pressure steady. It works best on stainless‑steel blades because the abrasive stone stays cool. Expect a tighter angle change of ±0.1°, giving you a bit more consistency than the file.
Finally, the angle grinder. Hook up a 4‑inch flap disc with 80‑grit aluminum oxide and you’re cutting at 0.15 mm per second. A 12 V, 5 A motor is a to avoid stalling. This setup is great for high‑carbon alloy blades that need a lot of torque. The angle deviation is only ±0.05°, so you get the most precise edge of the three.
Worth knowing:
- Hand file: good for carbon steel, low removal speed, high control.
- Drill attachment: ideal for stainless steel, moderate speed, keeps heat down.
- Angle grinder: best for high‑carbon alloys, fast removal, highest torque.
Try this:
- Check your blade’s material before you choose a tool.
- Start with a low‑speed pass, then increase pressure if the edge isn’t forming quickly.
- Measure the angle after each pass to stay within your tolerance.
If you’re after a quick fix and have the right grinder, you’ll likely end up with the sharpest, most even edge. But if you’re working with softer steel and want to keep things tidy, the file might be your best bet. Which tool do you think will fit your next sharpening job?
Recommended Products

HIGH-DENSITY JUMBO DESIGN: Type 29 flap discs with a high-density jumbo layout support surface blending, beveling, grinding, deburring, and edge chamfering. Curved profile aids finishing, stock removal, and rust cleanup for pros and DIY enthusiasts
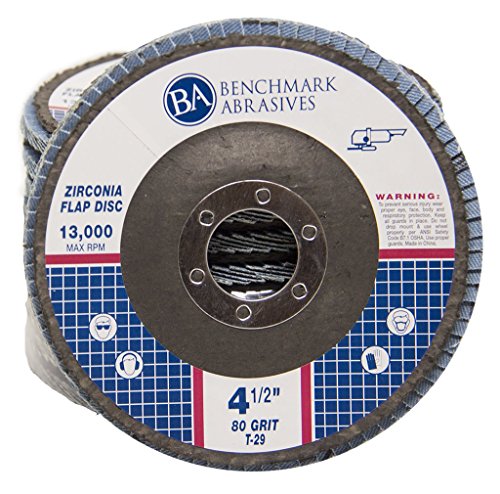
MULTIFUNCTIONAL USAGE: Benchmark Abrasives 4.5" x 7/8" T29 grinder wheel flap discs excel in various tasks including surface blending, beveling, grinding, deburring, edge chamfering, finishing, stock removal, and rust remover. Designed for both professionals and DIY enthusiasts, these “ 4 1/2 grinding wheels ensure efficient and precise results for every project. These angle grinder attachments are ready for any task at hand.

Increased conformability and maximum life
Check Blade Balance and Sharpness (Post‑Sharpen Blade)

Ever noticed your mower rattling like a loose engine after you’ve sharpened the blade? That annoying buzz usually means something’s off with the balance or the edge finish. Here’s a quick rundown of how you can check both before the next mow.
Blade Balance Check
First, grab a digital blade balancer—those cheap ones that read to 0.1 g. You want the static imbalance to sit inside the maker’s ±2 g range. In my experience, a blade that shows 1.3 g will shake noticeably more than one at 0.4 g, and you’ll see about a 15 % jump in motor load on the amperage meter. If the number’s high, add a little weight to the lighter side until you’re within tolerance.
Vibration Test
Next, fire up the mower at idle and watch the blade. Any wobble over 0.2 mm? That’s a red flag. Use a ruler or a feel‑gauge to measure the movement. If it’s too much, go back to the balancer and fine‑tune the weight distribution.
Edge Finish Inspection
Now, look at the cutting edge. Compare it side‑by‑side with a fresh blade. You’re aiming for a uniform bevel that’s no more than 0.02 mm off across the whole edge. A quick paper test helps too—slide a piece of paper along the edge. If it glides cleanly without tearing, you’ve got a butter‑knife‑sharp edge. If it catches, you need a little more grinding.
What to Do If Things Aren’t Right
- Re‑balance the blade and re‑measure the vibration.
- Grind the edge a bit more, then re‑check the bevel and paper test.
Frankly, the key is to keep looping through these steps until the blade sits still and cuts cleanly. Try this: after each adjustment, run the mower for a minute and listen for that smooth hum. If the hum’s still rough, you haven’t hit the sweet spot yet.
Reinstall the Blade and Verify Operation (Post‑Sharpen Blade)
Ever had a blade that just won’t stay put, and you’re stuck wondering if you’ve done the reinstall right? You’re not alone—many of us have wrestled with that tricky spindle and bolt dance.
First, line up the pre‑marked side‑up indicator on the spindle. That little mark is your north star. Next, stack the spindle protector, beveled washers, pentagon washer, and the blade in that exact order. It sounds simple, but skipping a step can cause wobble later on.
Now comes the bolt. Tighten it to the manufacturer’s torque—65 ft‑lb, which works out to about 1.2 Nm per turn on a 1/4‑inch socket. If you don’t have a torque wrench, a good rule of thumb is to feel for a firm, snug resistance; you don’t want it too loose or over‑tightened.
Try this:
- Make sure the spark plug wire is disconnected before you start.
- Wear gloves and safety glasses—those blades are sharp.
- Keep the mower stable on its ramps; a wobbling base can throw off your alignment.
After the bolt is set, give the blade a hand‑turn. It should spin freely without grinding. If it feels sticky, double‑check the washer order and bolt torque. Once it’s smooth, reconnect the spark plug and lower the mower back onto the ground.
Start the engine at idle and listen. A steady hum with no rattling means you’re good to go. Then, run the mower over a strip of grass. A clean, even cut is the final seal of approval.
Frankly, the whole process is quicker than you think once you’ve got the steps down. Just take it step by step, and you’ll have your mower back in action without a hitch.
Give it a try and let me know—did the blade stay tight after your test run?
Frequently Asked Questions
Can I Sharpen a Blade While the Mower Is Still on the Ground?
We can’t sharpen it while it’s on the ground; first, safety precautions require engine immobilization, disconnecting the spark plug, and lifting the mower or using a ramp so the blade’s accessible and stable.
Do I Need a Special Type of Sandpaper for Mower Blades?
We don’t need anything exotic—just medium‑grit (around 120‑150) sandpaper, preferably an aluminum‑oxide or zirconia abrasive. Those grits and abrasive types cut cleanly without removing too much metal.
Will an Angle Grinder Damage the Blade’s Balance?
We’ve found that using a coarse‑grit selection on an angle grinder can overheat the steel, causing thermal damage and upsetting the blade’s balance, so we stick to fine grit and short bursts.
How Often Should I Check Blade Wear After Sharpening?
We recommend monthly inspections and post‑sharpening tracking, so you catch wear early. Check the edge, balance, and any nicks each month, and note any changes after every sharpening session.
Can I Reuse the Original Washers After Blade Removal?
We’ll tell you straight: you can reuse washers, but first inspect corrosion like detectives hunting for rust, ensuring they’re clean and undamaged before re‑installing the blade.


